

The API client
When you build, Archie generates a TypeScript client for your project’s API surface. It includes:- One method per GraphQL query, mutation, and subscription
- One method per REST endpoint
- Type definitions matching your data model
- Error types for each failure mode
lib/api/ (or your stack’s equivalent). Use it from any component:
Authentication tokens
The API client picks up the active session token automatically. When a user signs in, their token is stored (httpOnly cookie by default) and attached to subsequent requests. Sign-out clears the token. Three flows are wired:- Browser session — the user’s auth token, used for browser-side calls
- Server-side — for SSR/RSC, the framework reads the cookie on each request
- External clients — server-to-server callers use API keys instead of session tokens
Real-time subscriptions
For data that changes live (an order list, a chat thread, a dashboard counter), use a subscription:File uploads
Files upload through a dedicated endpoint:Error handling
Each method’s return type includes typed errors. You handle errors with normal try/catch or by checking the result:Choose the backend environment
Your generated frontend connects to one backend environment at a time. New projects connect tomaster. You can point the frontend at another environment, such as staging, without regenerating it. See Environments for how environments work.
Where the control is
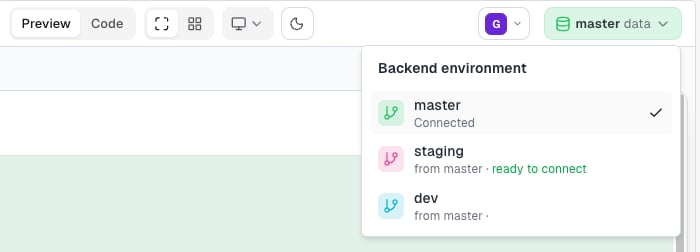
The control sits on the right side of the Frontend page header, next to the application chip. It shows a database icon and the environment name, for example master data. It appears in both Preview and Code.
Switch environments
1
Open the control
Click the environment name in the Frontend header. The Backend environment menu lists every environment, each with a colored branch icon.
2
Review the status of each environment
The current environment shows Connected. Every other row shows its parent environment and a readiness summary: ready to connect, ready with warnings, not ready, checking readiness, or not verified. An environment that isn’t active shows Unavailable.
3
Select an environment
The Switch to dialog opens, titled with the environment name. It says the preview will connect to that environment and rebuild, and that this can take a moment.
4
Review the readiness checks
The dialog summarizes the result as Ready to switch, Ready, with notes, Can’t switch yet, Checking…, or Some checks couldn’t be verified. Select Show all checks to see every check. After you fix a problem, select Check again.
5
Click Switch
Switch is disabled while any blocking issue remains or while the checks are running. Click Cancel to close the dialog without changing anything.
Readiness checks
Blocking issues stop the switch. Notes don’t, but some features may not work until you resolve them. A check that couldn’t be verified is never counted as a failure, so you can still switch.
Each failed check shows a hint and a link to the page where you fix it.
What happens when you switch
After you click Switch, a toast confirms Switching to the environment. The control shows a spinner and Switching to the environment name. While the switch runs, you can’t select another environment. The menu shows the current stage on the connected row:- Queued…
- Preparing the environment…
- Rebuilding the preview…
VITE_ARCHIE_ENVIRONMENT, VITE_ARCHIE_API_KEY, and VITE_ARCHIE_IDENTITY_API_KEY. Only the switch writes these. Don’t create variables with a VITE_ARCHIE_ prefix of your own.
When the switch finishes, a toast shows Connected to the environment. A toast titled Switched to the environment, with notes appears instead when something needs attention:
- Preview users couldn’t be created. Review them in Users.
- The preview may still show the previous data. Reload the preview.
- The app no longer has public (signed-out) access to data. Signed-in users aren’t affected. The toast gives the reason and the fix.
- Public access is narrower than before. The toast lists the roles that are no longer included.